Although automation has made life easier to take good photos, there are still some knowledge and skills you need to take a great photo. So far, we covered the basics like different ways to open your camera app, making sure you get that action shot with burst mode, getting rid of low-light blurriness, different lighting modes for portrait photography and overall exposure. I’ll leave the link to all these tips at the end of this article. But now, let’s dive into the last five tips for this series.
Zoom
If you played around with the camera app, you may have noticed that if you pinch outwards it zooms in and when you pinch inwards while zoomed in, it zooms out. You may think this is great, but it is actually digital-zoom. This type of zoom uses software to enlarge what is on screen but in the process, it degrades the quality. We’ll get into digital zoom and pixelated images in another post.
As with the depth-effect, optical zoom needs more than one lens. The same iPhones that are capable to use the depth effect, are able to zoom optically. These phones are the iPhone 7 and 8 Plus, X, XS, XS Max, 11, 11 Pro and 11 Pro Max.
When you open the camera app, you will see a circle just above the word photo or video with “1x” inside. To zoom to “2x” or two times, simply tap on the circle and it will instantly zoom in and use the telephoto lens to take a picture.
You are not limited to just 1x or 2x zoom. To zoom in increments of 0.1x, tap and hold the circle and drag from right to left. Another thing you may see is that you can zoom past 2x all the way up to 10x. This activates digital zoom and you will start losing quality when you pass the 2x zoom level.
Have a look at this video from GottaBeMobile to see the iPhone zoom in action.
Live Photos
Apple decided to extend the moment by adding a feature called Live Photo. When this feature is enabled, it captures a second and a half before and after each picture was taken, in video format. There is no need to worry about the still quality because of the “video” it takes.
When you send the photo from your phone to a printer or to your computer to edit, it will send as a photo, not a video.
To take a Live Photo, you just tap on the three concentric circles at the top in the middle of the screen. When enabled, the circles will turn yellow. Now you just take a picture.
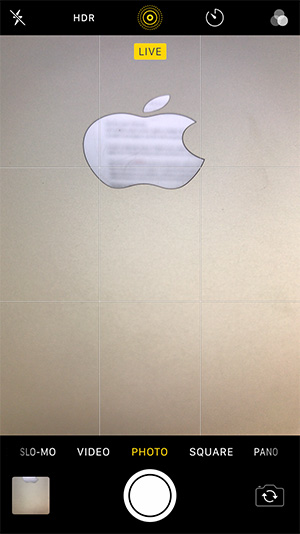
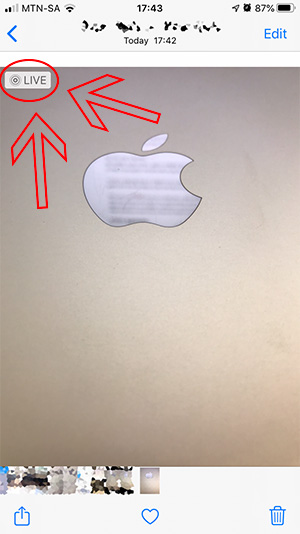
In your gallery, Live Photos are marked with a Live icon in the top left corner of a photo. When you swipe through the gallery and land on one, it will animate for half a second and the whole three-second preview will play when you tap and hold on it.
Square Photos & Panorama
Square Photos
Instagrammers, listen up! If you want to keep a high-resolution picture you want to post to Instagram, open the camera app and tap on the word Square, just above the shutter button. It crops your viewfinder to a square where you can frame your shot perfectly.
Panorama
If you find yourself at a breathtaking scene, stretching as wide as you can see and want to capture it, this one is for you. A panorama is a series of pictures stitched together to make one large picture.
To take a panorama, open the camera app and slide the words above the shutter button from right to left until the word Pano is visible and tap on it. To take the picture, by default, you will move your camera from left to right while it’s stitching. You can reverse this direction by tapping inside the rectangle in the middle of your screen.
Now aim the camera to the left-most (or right-most) part of the view you want to capture, tap and release the shutter button and move your iPhone slowly from left to right (or right to left). It is important to keep your phone level and not move up and down.
The on-screen instructions will guide you all the way by telling you to keep the phone steady on the line and to move slower if you are moving to fast.
Thirds Grid
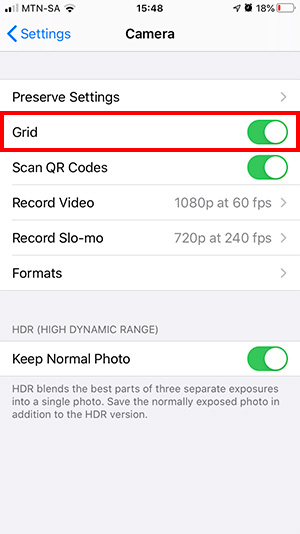
Ah, the rule of thirds. To take great photos, the rule of thirds helps you to not waste space in a picture and the iPhone gives you the option to use this grid. I’ll cover the rule of thirds in another post.
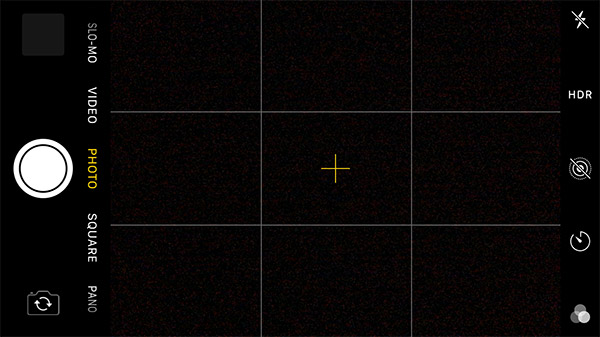
You can activate the grid on the iPhone to make framing much easier. Just head over to Settings > Camera and toggle the Grid button to on.
Preserve Settings
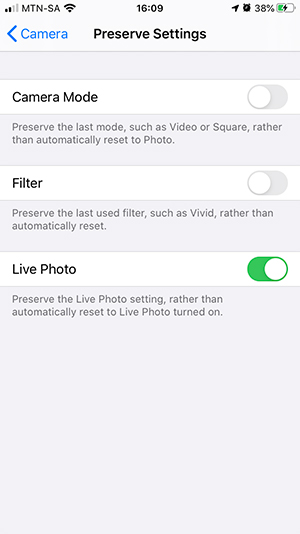
Now, if you like to change settings and don’t want to lose some of these settings, Apple incorporated a way to save them.
Closing
I really hope you enjoyed my series of 15 Awesome Tips to Take Great Photos with Your iPhone Camera. If there are any other tips or tricks you have, please let me know in the comments. Also, let me know whether these tips were helpful to you and which one was your favourite.
Interesting Reads
twt: 15 Awesome Tips to Take Great Photos with Your iPhone Camera, Part 1
The first of a three-part series with tips to take great photos and use your iPhone camera to its full potential.
Photo Credit: Daniel Romero
twt: 15 Awesome Tips to Take Great Photos with Your iPhone Camera, Part 2
To take stunning photos with your iPhone, these are your must-see tips
Photo Credit: Daniel Romero


