
Taking great photos on a phone camera has become easier in the past few years and the iPhone is an example of technology being pushed further to mimic some features of high-end DSLR cameras and a studio. Below are more stunning features the iPhone brings to the shoot.
Portrait Mode
What is Portrait Mode
Portrait Mode was designed to mimic the bokeh effect produced by DSLR lenses. Bokeh originated in the Japanese language and when translated, means “blur“.
This effect is used to focus the viewer on something specific while taking focus away from what’s not important, by blurring the background and keeping the subject sharp.
A DSLR lens uses the focal length and how deep the subject is relative to the background, to create the amount of blur. Only iPhones with two or more cameras will be able to create this effect because it uses the difference between the lenses to determine how far the subject is from the iPhone. It then uses software to blur the parts it senses are further away and keep the parts that are closer, sharp.
Supported iPhones models are the iPhone 7 Plus, 8 Plus, X, Xs, Xs Max, 11, 11 Pro and 11 Pro Max.
How to Use Portrait Mode
It’s quite easy to take photos with the smooth bokeh effect using your iPhone. Open the camera app and select portrait mode just above the camera shutter. The iPhone will give you on-screen advice to take that magic photo.
For the best results, try to have your subject approximately 2.5 meters (8 feet) away from the iPhone. The iPhone uses a mixture of the depth of field, determined with the two or more cameras, as well as facial recognition to establish what needs to be sharp and what needs to be blurred. Both the original and photo with the depth effect will be stored in your photo gallery.
Take a look at this video from MacRumors where they played around with the first Beta of iOS 10.1 which supported portrait mode on the iPhone 7 Plus.
Portrait Lighting
Whether you are looking for a dramatic look or just a better-lit face, the Portrait Lighting effect has a bundle of lighting effects to enhance your photos. As with Portrait Mode, it uses the depth, calculated using the two or more cameras, in addition to facial recognition to isolate a person’s face to apply the lighting effect to.
You can edit the Portrait Lighting effect in the photos app afterwards and choose another effect. There is a catch though. The effect can’t be added to a standard photo thus, the original photo must have been taken with one of the Portrait Lighting effects.
Here is a list of the five different effects and what they do.
1) Natural Light
This basically activates Portrait Mode, adding the background blur but doesn’t add any lighting effects.
2) Studio Light
With studio lights, it is easy to spread the light from all angles across a subject. In the real world, not so much. The studio effect tries to replicate this even lighting across a person’s face.
3) Contour Light
Also trying to reproduce a studio setting, the contour lighting effect adds shadows instead of spreading the light evenly. It looks for round parts in the person’s face, such as the rounded sides or cheekbones, and adds shadows to give it a more prominent look.
4) Stage Light
The Stage and Contour Light does the same with the lighting on the face, but the difference lies in the background. Stage Light tries so simulate the subject being on a dark stage and changes the background to black.
5) Stage Light Mono
Yes, it’s exactly what the name suggests. The Stage Light effect, but the image is black and white.
Portrait Light in Action
Have a look at this video from TheUnlockr to see the different effects in action.
Exposure & Focus
Background
Explaining exposure can get rather technical so I will leave that for another article. For today’s objective, all you need to understand is that it consists of three elements that make up the brightness of a photo.
In some situations, the autofocus and auto exposure will not lit and focus exactly where you want it to. Luckily, you have a small degree of manual control.
Manually Automatic Setting
To set the exposure and a focus point is a piece of cake. Aim the camera towards the subject and simply tap on the screen on the subject you want to have in focus and correctly lit. You will see the brightness and focus adjust live on-screen, to have the subject that you tapped on, correctly exposed and in focus.
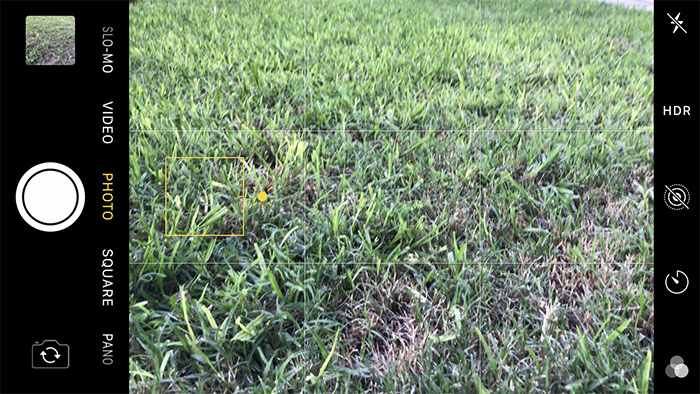
By just tapping once, you set the exposure and focus until the automated system in your iPhone feels that there is another or better subject to focus on but again, you can take control.
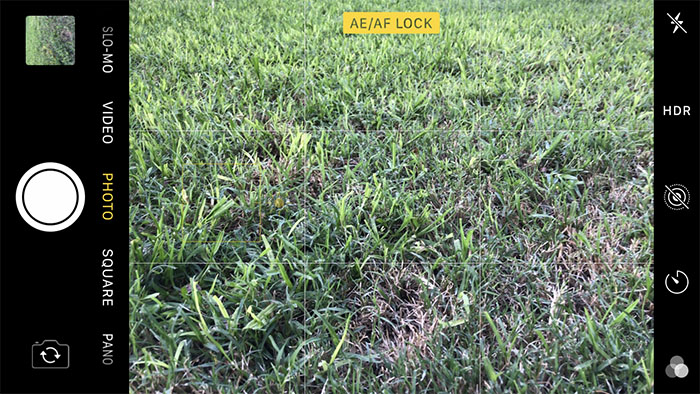
To set the exposure and focus indefinitely, tap and hold on the subject to enable the AE/AF Lock, which you will see at the top of your screen. When locked, the exposure and focus will adjust and re-adjust to whatever is in that yellow block as you move the camera around. In case you didn’t know, AE stands for Auto Exposure and AF for Auto Focus.
Completely Manual
You can take it one step further by adjusting the exposure yourself. To do this, you can either set the exposure and focus point once or lock it. When the yellow square is on the screen, slide up to make the image lighter or down to make it darker.
One very important thing to remember when setting the exposure manually is the brightness of your iPhone screen. Make sure to turn the brightness all the way up, to make sure the exposure you are setting on-screen is the exposure you’ll get once you’ve taken the photo.
HDR
What is HDR
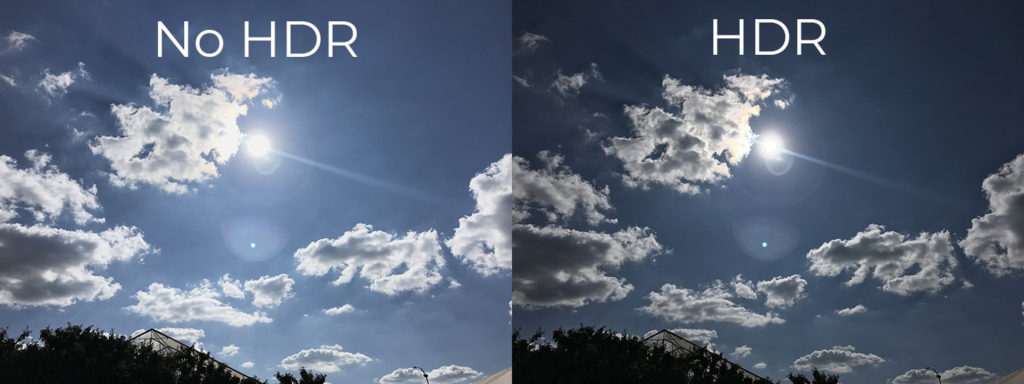
HDR is short for High Dynamic Range and focusses on the light and dark parts of a photo. It is mostly used in scenes where there is a big difference between the lightest and darkest part of the scene. It can also be used to emphasise colours by capturing the lightest and darkest parts of each colour.
In an HDR image, the brightness of the lightest parts are decreased and the brightness of the darkest parts, increased.
To produce an HDR photograph you normally need a minimum of three bracketed photographs. Bracketing is a method where the same photo is taken three or more times, but with different exposures. These photos range from being too dark, to normal and too bright.
The three or more photos are then layered on top of each other with specialised software to make one photo that accentuates every part of the photo.
iPhone and HDR
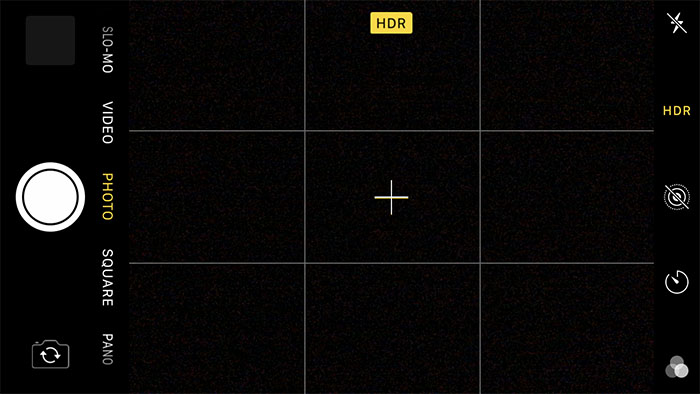
HDR on the iPhone has three settings namely Auto, On and Off. When set to Auto, your iPhone will determine whether the range between light and dark is too high and take an HDR photo if it feels it’s necessary. When switched to On, it will take an HDR photo, regardless of what the software determined and when set to Off, it will take a normal photo.
At the top of the screen, tap on HDR and you will find the three above-mentioned options.

The iPhone does the bracketing automatically and doesn’t require you to take any action in taking multiple photos. By default, the original photograph will be kept in your gallery, but you can change this behaviour in the camera settings in the Settings app.
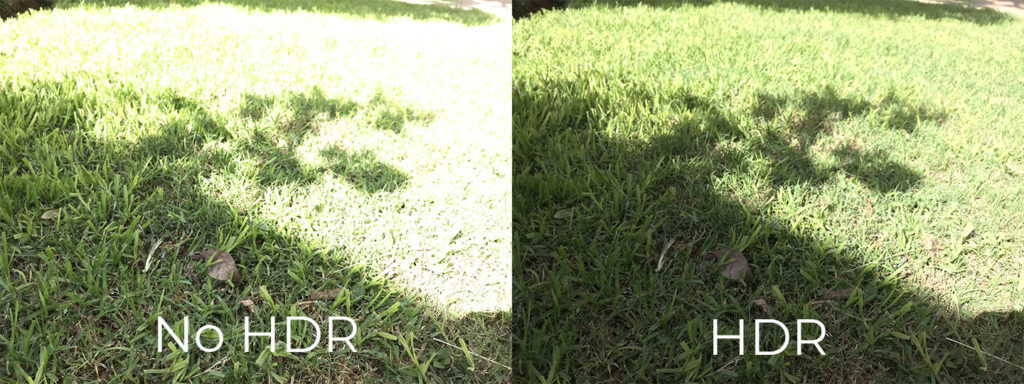
To get the most out of the iPhone’s HRD, I have one bit of advice from my experience. Switch on the HDR function and tap on a darker part of the current live screen, but not necessarily the darkest. This way, you light up the darker parts and the iPhone uses its HDR software to decrease the brightness of the lightest parts. Have a look at these two different photos I took on my iPhone 8, using HDR.
Filters
One of the biggest hits on Instagram was filters. A filter is a colour or layer with a specific purpose that is overlayed on an image to give it the desired feeling. On the iPhone, you have a variety of filters ranging from Vivid that makes the colours pop, to warming and cooling effects to Silvertone that overlays a high contrast black and white filter.
To access the filters on your iPhone, tap on the triangle made out of circles, situated at the top of the screen, or simply swipe up anywhere on the live view. Tap on your desired filter and see the effect live on your screen.
Closing
Hope you enjoyed part two my series of 15 Awesome Tips to Take Great Photos with Your iPhone Camera. Let me know in the comments which of these effects or tricks are your favourite.
Part one is linked below in case you missed it.
Interesting Read
twt: 15 Awesome Tips to Take Great Photos with Your iPhone Camera, Part 1
The first of a three-part series with tips to take great photos and use your iPhone camera to it’s full potential
Photo Credit: Daniel Romero